
Tutorials to read first:
Magic Tutorial #1: Getting Started
Commands introduced in this tutorial:
box, clockwise, copy, erase, findbox, grid, label, tech, macro, move, paint, redo, save, select, sideways, undo, upsidedown, view, what, writeall, zoom
Macros introduced in this tutorial:
a, A, c, d, ^D, g, G, s, S, t, T, u, U, v, z, Z, 4, keypad keys
The two most basic and essential layout operations are painting and
erasing. They can be invoked using the
paint and
erase
commands, or using the buttons, or using the toolbar. The easiest
way to paint and erase is with the mouse buttons. To paint,
position the box over the area
you'd like to paint, then move the  cursor over a color and click the middle mouse button. To erase
everything in an area, place the box over the area, press the Shift
key, and while holding it down, click the middle mouse button; or,
place the box over the area, move the
cursor over a blank spot, and click the middle mouse button.
Try painting and erasing various colors. If the screen gets
totally messed up, you can always exit Magic and restart it.
While you're painting, white dots may occasionally appear
and disappear. These are design rule violations detected
by Magic, and will be explained in "Magic Tutorial
#6: Design Rule Checking". You can ignore them for now.
cursor over a color and click the middle mouse button. To erase
everything in an area, place the box over the area, press the Shift
key, and while holding it down, click the middle mouse button; or,
place the box over the area, move the
cursor over a blank spot, and click the middle mouse button.
Try painting and erasing various colors. If the screen gets
totally messed up, you can always exit Magic and restart it.
While you're painting, white dots may occasionally appear
and disappear. These are design rule violations detected
by Magic, and will be explained in "Magic Tutorial
#6: Design Rule Checking". You can ignore them for now.
Now go to the menu button "Options" at the top of the
layout window, click it, and select the button "Toolbar"
from the menu. You should get a toolbar that looks something like
Figure 1.
If you do not have a version of Magic compiled
with Tcl/Tk support, then you will not have access to the toolbar.
When you enable the toolbar, a bunch of buttons will appear on the
right side of the window, each one containing a different color
and/or pattern of paint. You can click on these buttons similar
to the way you do on the layout window. While the button bindings
on the layout window change with the selected "tool" (see Tutorial #1),
the button bindings on the toolbar are fixed: Clicking the right
button will cause all paint of that type on the layout (and the
toolbar) to disappear. Clicking the left button will cause all paint
of that type on the layout to be shown. Clicking the middle button
will paint that layer type inside the box on the layout window.
An additional feature of the toolbar is that when the
cursor is
on top of one of the toolbar buttons, the name of the layer pictured
in the button will appear on the right side of the title bar. As
a tutorial exercise, find the buttons for the layer types "polysilicon",
"metal1", "ndiffusion", "polycontact", and "ntransistor" (all of which
are mentioned in the paragraph below). Most of these layers have
multiple names, so that if you use the command line to refer to, for
example, "polysilicon", you may also use the common name "poly", or
"red". Likewise, "ndiffusion" may be called "ndiff" or "green"
on the command line, "ntransistor" may be called "nfet", and
"polycontact" may be called "pc".

| Figure 1: The toolbar in the Tcl/Tk version of Magic. The image shown corresponds to the default "SCMOS" technology file, and the OpenGL graphics package. |
There is a second way of erasing paint that allows you to
erase some layers without affecting others. This is the
macro ^D (control-D, for "Delete paint"). To
use it, position the box over the area to be erased, then move
the cursor over a splotch of paint
containing the
layer(s) you'd like to erase. Type ^D key on
the text keyboard: the colors underneath the cursor will
be erased from the area underneath the box, but no other
layers will be affected. Experiment around with the ^D
macro to try different combinations of paints and erases.
If the cursor is over empty space then the ^D
macro is equivalent to the middle mouse button: it erases
everything.
You can also paint and erase using the long commands
paint layers
erase layers
In each of these commands layers is one or more layer names separated by commas (you can also use spaces for separators, but only if you enclose the entire list in double-quotes). Any layer can be abbreviated as long as the abbreviation is unambiguous. For example, paint poly,metal1 will paint the polysilicon and metal1 layers. The macro ^D is predefined by Magic to be erase $ ($ is a pseudo-layer that means "all the layers underneath the cursor").
There are probably going to be times when you'll do things that you'll later wish you hadn't. Fortunately, Magic has an undo facility that you can use to restore things after you've made mistakes. The command
undo
(or, alternatively, the macro u) will undo the effects of the last command you invoked. If you made a mistake several commands back, you can type undo several times to undo successive commands. If you undo something and then decide you wanted it after all, you can undo the undo with the command
redo
(U is a macro for this command). Try making a few paints and erases, then use undo and redo to work backwards and forwards through the changes you made.
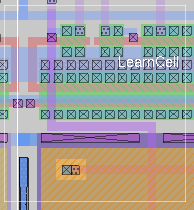
The first thing to do is to learn how to select.
Move the cursor over the upper portion of
the L-shaped blue area in tut2b, and type s, which
is a macro for select.
The box will jump over to cover the vertical part of the "L". This
operation selected a chunk of material (a chunk is
defined as the largest possible rectangle of a single given material
that contains the cursor point). Move the box away from
the chunk, and you'll see that a thin white outline is left
around the chunk to show that it's selected. Now move the cursor
over the vertical red bar on the right of the cell and type s.
The box will move over that bar, and the selection highlighting will
disappear from the blue area.
If you type s several times without moving the cursor, each command selects a slightly larger piece of material. Move the cursor back over the top of the blue "L", and type s three times without moving the cursor. The first s selects a chunk. The second s selects a region (all of the blue material in the region underneath the cursor, rectangular or not). The third s selects a net (all of the material that is electrically connected to the original chunk; this includes the blue metal, the red polysilicon, and the contact that connects them).
The macro S (short for
select more) is just
like s
except that it adds on to the selection, rather than replacing it.
Move the cursor over the vertical red
bar on the right
and type S to see how this works. You can also type S
multiple times to add regions and nets to the selection.
If you accidentally type s or S when the cursor is over space, you'll select a cell (tut2b in this case). You can just undo this for now. Cell selection will be discussed in "Magic Tutorial #4: Cell Hierarchies".
You can also select material by area: place the box around the material you'd like to select and type a (short for select area). This will select all of the material underneath the box. You can use the macro A to add material to the selection by area, and you can use the long command
select
[more] area layers
to select only material on certain layers. Place the box around everything in tut2b and type "select area metal1" followed by "select more area poly".
If you'd like to clear out the selection without modifying any of the selected material, you can use the command
select clear
or type the macro C. You can clear out just a portion of the selection by typing "select less" or "select less area layers"; the former deselects paint in the order that select selects paint, while the latter deselects paint under the box (just as select area selects paint under the box).
Another way to select a specific material under the box is to use the toolbar. Put the cursor over the toolbar button containing the type of material that you want to select, then type the s key. All material of this type under the box will be selected. The S key over the toolbar button removes all material of that type from the current selection.
For a synopsis of all the options to the select command, type
select help
Once you've made a selection, there are a number of operations you can perform on it:
delete
move [direction [distance]]
stretch [direction [distance]]
copy
upsidedown
sideways
clockwise [degrees]
rotate [[+|-]degrees]
The delete command deletes everything that's selected. Watch out: delete is different from erase, which erases paint from the area underneath the box. Select the red bar on the right in tut2b and type d, which is a macro for delete. Undo the deletion with the u macro.
The move command picks up both the box and the selection and moves them so that the lower-left corner of the box is at the cursor location. Select the red bar on the right and move it so that it falls on top of the vertical part of the blue "L". You can use t ("translate") as a macro for move. Practice moving various things around the screen. The command copy and its macro c are just like move except that a copy of the selection is left behind at the original position.
There is also a longer form of the move command that you can use to move the selection a precise amount. For example, move up 10 will move the selection (and the box) up 10 units. The direction argument can be any direction like left, south, northwest, down, etc. See the command reference page for a complete list of the legal directions. The keypad keys are defined as macros to move the selection in the direction of the keypad arrow by one unit. For a detailed explanation of units of distance, see the command reference page.
The stretch command is similar to move except that it stretches and erases as it moves. stretch does not operate diagonally, so if you use the cursor to indicate where to stretch to, Magic will either stretch up, down, left, or right, whichever is closest. The stretch command moves the selection and also does two additional things. First, for each piece of paint that moves, stretch will erase that layer from the region that the paint passes through as it moves, in order to clear material out of its way. Second, if the back edge of a piece of selected paint touches non-selected material, one of the two pieces of paint is stretched to maintain the connection. The keypad keys 8, 4, 6, and 2 (the non-diagonal directions) pressed while the Shift key is held down implement macros for the stretch direction 1 command The macro T is predefined to stretch. To see how stretching works, select the horizontal piece of the green wire in tut2b and type keypad-8, then keypad-2. Stretching only worries about material in front of and behind the selection; it ignores material to the sides (try the keypad-4 and keypad-6 macros to see). You can use plowing (described in Tutorial #3) if this is a problem.
The command upsidedown will flip the selection upside down, and sideways flips the selection sideways. Both commands leave the selection so it occupies the same total area as before, but with the contents flipped. The command "clockwise degrees" will rotate the selection clockwise, leaving the lower-left corner of the new selection at the same place as the lower-left corner of the old selection. The value degrees must be a positive multiple of 90, and defaults to 90. The command rotate is the same as clockwise but may take negative multiples of 90 for counterclockwise rotation.
At this point you know enough to do quite a bit of damage to the tut2b cell. Experiment with the selection commands. Remember that you can use undo to back out of trouble.
tool pickyou will get the "pick tool", a special tool for implementing interactive selection moves and copying. You will notice a circular crosshair ("
 ") cursor,
and the title bar will announce "Tool: pick".
") cursor,
and the title bar will announce "Tool: pick". Assuming an original and unmodified tut2b cell, create a box around the top half of the layout to surround the areas of metal1, polysilicon, and polycontact. Type the key macro a to select all of this material at once. Note that the left and right mouse buttons retain their usual function of manipulating the box corners in the "pick" tool.
Now, click the middle mouse button. The selection will disappear
from the layout, but you will find that the outline of the
selection is still visible, and follows the cursor (which is
now a "pointing hand" (" ") glyph)
around.
To do an interactive copy, place the selection outline anywhere
on the layout and click the left mouse button. The selection
will be copied at that position. However, the selection outline
remains and continues to follow the cursor around the layout.
Find a different position on the layout, and click the left
mouse button again. You can make any number of copies of the
selected material this way. Now, go to yet another position,
and click the middle mouse button. The selection is placed, as
before, but this time the outline does not appear, does not
follow the cursor, and the cursor glyph has reverted to the
"" shape.
") glyph)
around.
To do an interactive copy, place the selection outline anywhere
on the layout and click the left mouse button. The selection
will be copied at that position. However, the selection outline
remains and continues to follow the cursor around the layout.
Find a different position on the layout, and click the left
mouse button again. You can make any number of copies of the
selected material this way. Now, go to yet another position,
and click the middle mouse button. The selection is placed, as
before, but this time the outline does not appear, does not
follow the cursor, and the cursor glyph has reverted to the
"" shape.
If you wish to do the same interactive copy or move, but don't want to erase the original selection, press and hold the Shift key before you click the middle mouse button. You are placed in the same interactive copy-or-move mode as described above.
To return to the "box tool" mode, where the middle mouse button is used to paint and erase material, type the Space bar, or type the command
tool boxand you will return to the box tool mode with the "
" cursor.
Labels are pieces of text attached to the paint of a cell. They are used to provide information to other tools that will process the circuit. Most labels are node names: They provide an easy way of referring to nodes in tools such as routers, simulators, and timing analyzers. Labels may also be used for other purposes: for example, some labels are treated as attributes that can provide, for example, information about the direction of signal flow through a transistor.
Load the cell tut2c and place a point label (which appears as a cross) in the middle of the red chunk (a cross, or point is a box with zero width and zero height. Position the lower-left corner of the box with the left button and then click the right button to place the upper-right corner at the same position as the lower-left corner). Then type the command label test. A new label will appear at the position of the box. The complete syntax of the label command is
label text [position [layer]]
Text must be supplied, but the other arguments can be defaulted. If text has any spaces in it, then it must be enclosed in double quotes. Position tells where the text should be displayed, relative to the point of the label. It may be any of the valid directions. For example, if direction "ne" is given, the text will be displayed above and to the right of the label point. If no position is given, Magic will pick a position for you. Layer tells which paint layer to attach the label to. If layer covers the entire area of the label, then the label will be associated with the particular layer. If layer is omitted, or if it doesn't cover the label's area, Magic initially associates the label with the "space" layer, then checks to see if there's a layer that covers the whole area. If there is, Magic moves the label to that layer. It is generally a bad idea to place labels at points where there are several paint layers, since it will be hard to tell which layer the label is attached to. As you edit, Magic will ensure that labels are only attached to layers that exist everywhere under the label. To see how this works, paint the layer pdiff (brown) over the label you just created: the label will switch layers. Finally, erase poly over the area, and the label will move again.
Although many labels are point labels, this need not be the case. You can label any rectangular area by setting the box to that area before invoking the label command. This feature is used for labeling terminals for the router (see below), or for labeling ports used by LEF file macro definitions. Tut2c has examples of point, line, and rectangular labels.
All of the selection commands apply to labels as well as paint. Whenever you select paint, the labels attached to that paint will also be selected. Selected labels are highlighted in white. Select some of the chunks of paint in tut2c to see how the labels are selected too. When you use area selection, labels will only be selected if they are completely contained in the area being selected. If you'd like to select just a label without any paint, make the box into a cross and put the cross on the label: s and S will select just the label.
There are several ways to erase a label. One way is to select and then delete it. Another way is to erase the paint that the label is attached to. If the paint is erased all around the label, then Magic will delete the label too. Try attaching a label to a red area, then paint blue over the red. If you erase blue the label stays (since it's attached to red), but if you erase the red then the label is deleted.
You can also erase labels using the "erase labels" command. The command
erase labels
The Tcl/Tk-based version of Magic has two macros + (plus) and - (minus) that implement auto-increment and auto-decrement, respectively. On the layout, set the box on any available paint and type "label test1". Then, move the box somewhere else and type the key +. Do this several more times. Then, move the box once again and type the key -. Anyone who has ever tried to label a 64-bit digial bus will immediately understand the usefulness of these macros. Note that the auto-increment and -decrement macros make use of a special macro (see below) that retains the text of the last long command typed. They operate by searching the last long command for the first number embedded in the string, increment or decrement that number, replace the command string, then execute it. So the auto increment and decrement macros only work properly when the last long command typed is the label command. (As an aside, note that according to the definition, the macros will in fact operate on any command, so that the command "move e 1" followed by the key macro + will execute the command "move e 2", "move e 3", etc. It seems unlikely, however, that anyone would find this aspect of the command useful.)
When creating labels, Magic will permit you to use absolutely any text whatsoever. However, many other tools, and even parts of Magic, expect label names to observe certain conventions. Except for the special cases described below, labels shouldn't contain any of the characters "/$@!^". Spaces, control characters, or parentheses within labels are probably a bad idea too. Many of the programs that process Magic output have their own restrictions on label names, so you should find out about the restrictions that apply at your site. Most labels are node names: each one gives a unique identification to a set of things that are electrically connected. There are two kinds of node names, local and global. Any label that ends in "!" is treated as a global node name; it will be assumed that all nodes by this name, anywere in any cell in a layout, are electrically connected. The most common global names are Vdd! and GND!, the power rails. You should always use these names exactly, since many other tools require them.
Any label that does not end in "!" or any of the other special characters discussed below is a local node name. It refers to a node within that particular cell. Local node names should be unique within the cell: there shouldn't be two electrically distinct nodes with the same name. On the other hand, it is perfectly legal, and sometimes advantageous, to give more than one name to the same node. It is also legal to use the same local node name in different cells: the tools will be able to distinguish between them and will not assume that they are electrically connected. There are occasions when it is useful to have two electrically disconnected nodes with the same node name, usually so that the nodes will be conveniently merged together in the output netlist used for simulation. This feature should be used rarely, and cautiously, because it "fakes" an electrical connection where none exists in the physical layout.
Another label type is a port label, which is a label created in the normal manner but declared to be a "port" of a subcell by using the command port. This is used mostly by the LEF and DEF output read and write routines, and is not covered in this tutorial.
The only other labels currently understood by the tools are attributes. Attributes are pieces of text associated with a particular piece of the circuit: they are not node names, and need not be unique. For example, an attribute might identify a node as a chip input, or it might identify a transistor terminal as the source of information for that transistor. Any label whose last character is "@", "$", or "^" is an attribute. There are three different kinds of attributes. Node attributes are those ending with "@"; they are associated with particular nodes. Transistor source/drain attributes are those ending in "$"; they are associated with particular terminals of a transistor. A source or drain attribute must be attached to the channel region of the transistor and must fall exactly on the source or drain edge of the transistor. The third kind of attribute is a transistor gate attribute. It ends in "^" and is attached to the channel region of the transistor. To see examples of attributes and node names, edit the cell tut2d in Magic.
Special conventions apply to labels for routing terminals. The standard Magic router (invoked by route) ignores all labels except for those on the edges of cells. (This restriction does not apply to the gate-array router, Garoute, or to the interactive router, Iroute). If you expect to use the standard router to connect to a particular node, you should place the label for that node on its outermost edge. The label should not be a point label, but should instead be a horizontal or vertical line covering the entire edge of the wire. The router will choose a connection point somewhere along the label. A good rule of thumb is to label all nodes that enter or leave the cell in this way. For more details on how labels are used by the standard router, see "Magic Tutorial #7: Netlists and Routing". Other labeling conventions are used by the Garouter and Irouter; consult their respective tutorials for details.
Magic provides a variety of ways to save your cells on disk. Normally, things are saved in a special Magic format. Each cell is a separate file, and the name of the file is just the name of the cell with .mag appended. For example, the cell tut2a is saved in file tut2a.mag. To save cells on disk, invoke the command
writeall
This command will run through each of the cells that you have modified in this editing session, and ask you what to do with the cell. Normally, you'll click the write button, in which case the cell will be written back to the disk file from which it was read (if this is a new cell, then you'll be asked for a name for the cell). If you click the autowrite button, then Magic will write out all the cells that have changed without asking you what to do on a cell-by-cell basis. The flush button will cause Magic to delete its internal copy of the cell and reload the cell from the disk copy, thereby expunging all edits that you've made. The skip button will pass on to the next cell without writing this cell (but Magic still remembers that it has changed, so the next time you invoke writeall Magic will ask about this cell again). Finally, the abort button will stop the command immediately without writing or checking any more cells.
NOTE: The non-Tcl/Tk version of Magic doesn't keep checkpoint files. This means that if the system should crash in the middle of a session, you'll lose all changes since the last time you wrote out cells. It's a good idea to save your cells frequently during long editing sessions. The Tcl/Tk interpreter-enabled version of Magic uses checkpoint files, so work is saved periodically and can be recovered after a crash by specifying "magic -r".
You can also save the cell you're currently editing with the command
save name
This command will append ".mag" to name and save the cell you are editing in that location. If you don't provide a name, Magic will use the cell's name (plus the ".mag" extension) as the file name, and it will prompt you for a name if the cell hasn't yet been named.
Once a cell has been saved on disk you can edit it by invoking Magic with the command
magic name
where name is the same name you used to save the cell (the ".mag" extension is optional).
Magic can also read and write files in CIF and GDS Stream formats. See "Magic Tutorial #9: Format Conversion for CIF and GDS" for details. Normally it is not a good idea to save Magic layouts in CIF or GDS format, because most technology files do not define completely reversible operations between the input and output descriptions, so layout can become altered in the process.
Magic can generate hardcopy plots of layouts in two ways: PostScript (color), and PNM (the standard "Portable aNyMap" graphics format that can be massaged in many ways). To plot part of your design in PostScript, place the box around the part you'd like to plot and type
plot postscript file [layers]
This will generate a plot of the area of the box. Everything visible underneath the box will appear in more-or-less the same way in the plot. If layers is given, it specifies exactly what information is to be plotted. Only those layers will appear in the plot. The special "layer" labels will enable label plotting. The default width (or height) of the plot is the width of the printer page. The width can be changed using the "plot parameter PS_Width value" command, where the value is in PostScript units (1/72 inch).
The PNM style of plotting generates a file of pixel values for the region to be plotted. This can be useful for input to other image tools, or for generation of slides and viewgraphs for presentations. The PNM format is readily understood by various graphics manipulation programs. The standard Linux program convert can convert the PNM image to any other standard format such as GIF or JPEG (a useful thing to do, since PNM images are not compressed in any way). The PNM plot blends and antialiases colors in the layout, and so is exceptionally good at generating fine detail at the scale of entire chip layouts. The PNM plot is created with the command
plot pnm file [scale [layers]]
As a rule of thumb, small layouts where features such as transistor gates and contacts are easily visible should be plotted with PostScript output. Large layouts where transistor gates and contacts are difficult to see should be plotted with PNM output. PNM output is especially useful to generate full-chip pictures that are good for drawing bond wire diagrams, or just to tape on the wall. NOTE: To get PostScript output, it is necessary that the technology file describe the colors and stipple patterns used in its plot section. Otherwise, if nothing is defined, the output will be a blank page. PNM plots, on the other hand, will make use of a style automatically generated from the layout color definitions, and so does not need any special handling in the technology file (although the technology file plot section may be used to refine the colors used in the image).
There are several additional commands that you will probably find useful once you start working on real cells. The command
grid [spacing]
grid xSpacing ySpacing
grid xSpacing ySpacing xOrigin yOrigin
grid off
will display a grid over your layout. Initially, the grid has a one-unit spacing. Typing grid with no arguments will toggle the grid on and off. If a single numerical argument is given, the grid will be turned on, and the grid lines will be spacing units apart. The macro g provides a short form for grid and G is short for grid 2. If you provide two arguments to grid, they are the x- and y-spacings, which may be different. If you provide four arguments, the last two specify a reference point through which horizontal and vertical grid lines pass; the default is to use (0,0) as the grid origin. The command grid off always turns the grid off, regardless of whether or not is was previously on. When the grid is on, a small black box is displayed to mark the (0,0) coordinate of the cell you're editing.
An alternative to the grid for helping with the alignment of geometry on the layout is the interactive crosshair. In the Tcl/Tk-enabled version of Magic, choose the menu button "Options" followed by selecting the check button "Crosshair". When this is selected, a light yellow crosshair follows the cursor, helpfully snapping to the grid. It can be removed by unchecking the menu check button.
If you want to create a cell that doesn't fit on the screen, you'll need to know how to change the screen view. This can be done with three commands:
zoom factor
findbox [zoom]
view
If factor is given to the zoom command, it is a zoom-out factor. For example, the command "zoom 2" will change the view so that there are twice as many units across the screen as there used to be (Z is a macro for this). The new view will have the same center as the old one. The command "zoom .5" (macro z) will increase the magnification so that only half as much of the circuit is visible.
The findbox command is used to change the view according to the box. The command alone just moves the view (without changing the scale factor) so that the box is in the center of the screen. If the zoom argument is given then the magnification is changed too, so that the area of the box nearly fills the screen. ^Z is a macro for "findbox zoom" and B is a macro for "findbox".
The command view resets the view so that the entire cell is visible in the window. It comes in handy if you get lost in a big layout. The macro v is equivalent to view.
The command box prints out the size and location of the box in case you'd like to measure something in your layout. The macro b is predefined to box. The box command can also be used to set the box to a particular location, height, or width. See the command reference page for details.
The command
what
will print out information about what's selected. This may be helpful if you're not sure what layer a particular piece of material is, or what layer a particular label is attached to.
If you forget what a macro means, you can invoke the command
macro [char]
This command will print out the long command that's associated with the macro char. If you omit char, Magic will print out all of the macro associations. The command
macro char command
macro 1 "echo You just typed the 1 key."then type the 1 key.
One of the macros, ".", has special meaning in Magic. This macro is always defined by the system to be the last long command you typed. Whenever you'd like to repeat a long command, all you have to do is use the dot macro.
In the Tcl/Tk-based version of Magic, macro commands may be Magic commands, Tcl/Tk commands, or any combination thereof. Macros using Tcl commands are used to implement the auto-increment and auto-decrement label features mentioned above in the section on labels.
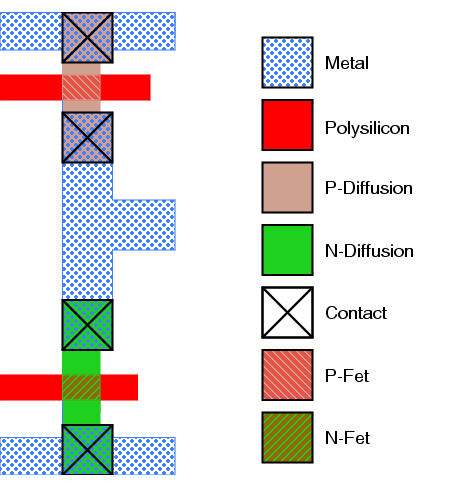
The paint layers available in Magic are different from those that you may be used to in Cadence and other systems because they don't correspond exactly to the masks used in fabrication. We call them abstract layers because they correspond to constructs such as wires and contacts, rather than mask layers. In Magic there is one paint layer for each kind of conducting material (polysilicon, ndiffusion, metal1, etc.), plus one additional paint layer for each kind of transistor (ntransistor, ptransistor, etc.), and, finally, one further paint layer for each kind of contact (pcontact, ndcontact, m2contact, etc.) Each layer has one or more names that are used to refer to that layer in commands. To find out the layers available in the current technology, type the command
tech layers
In addition to the mask layers, there are a few pseudo-layers that are valid in all technologies; these are listed in Table 1. Each Magic technology also has a technology manual describing the features of that technology, such as design rules, routing layers, CIF styles, etc. If you haven't seen any of the technology manuals yet, this is a good time to take a look at the one for your process.
|
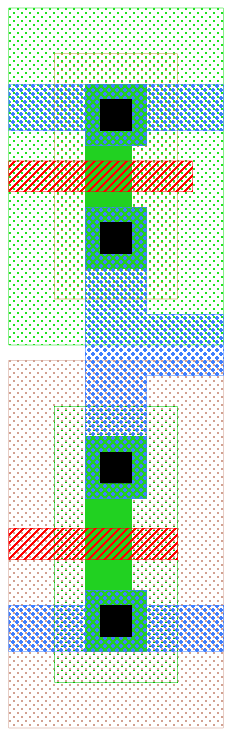
If you're used to designing with mask layers, Magic's abstract layers will take some getting used to. One of the reasons for abstract layers is to save you work. In Magic you (normally) don't draw implants, wells, buried windows, or contact via holes. Instead, you draw the primary conducting layers and paint some of their overlaps with special types such as n-transistor or polysilicon contact. For transistors, you draw only the actual area of the transistor channel. Magic will generate the polysilicon and diffusion, plus any necessary implants, when it creates a CIF file. For contacts, you paint the contact layer in the area of overlap between the conducting layers. Magic will generate each of the constituent mask layers plus vias and buried windows when it writes the CIF file. Figure 2 shows a simple cell drawn with both mask layers (as in Cadence) and with abstract layers (as in Magic). If you're curious about what the masks will look like for a particular layout, you can use the cif see command to view the mask information.
 |
 |
An advantage of the abstract layers used in Magic is that they simplify the design rules. Most of the formation rules (e.g. contact structure) go away, since Magic automatically generates correctly-formed structures when it writes CIF or GDS. All that are left are minimum size and spacing rules, and Magic's abstract layers result in fewer of these than there would be otherwise. This helps to make Magic's built-in design rule checker very fast (see "Magic Tutorial #6: Design Rule Checking"), and is one of the reasons plowing is possible.